STATION WAGONS - Headliners, Foam Backed (ALL)

right over the existing headliner if you remove
any tattered pieces and remove the fabric from the perimeter molding.
The conversion headliner and the installation process make for
a neat, professional headliner replacement.
The job is described in the instructions below to help you
to decide on this headliner and on self-installation.
The numbered pictures for these instructions are above.
These instructions will also be included with the headliner we send you.
This is a standard upholstery shop procedure which has been applied
for many years in thousands of cars.
If you do not wish to do the labor yourself, please
consult your yellow pages (under "automobile seat covers, upholstery and tops")
and either have your shop purchase a conversion headliner, or ask if
they will install the headliner that you purchase here.
Select a headliner fabric from the swatches scanned above.
Make a note of your selection.
You will provide this fabric choice in your checkout message box.
1. Re-glue any tattered pieces of the old headliner or remove.
Remove the old headliner around the perimeter molding.
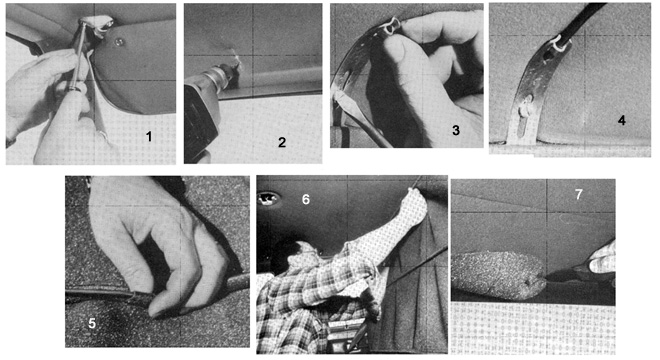
2. Remove the parts that are screwed in over the headliner:
dome light, coat hangers, visors, seat belt hardware. Store them.
Illustration 1 shows visor brackets being removed.
Leave all the molding in place.
3. Re-install all the screws that held the hardware.
They will be needed to locate little holes in the new headliner.
4. Note: The new headliner installs onto bows which are metal rods supplied.
These rods thread into the headliner pockets provided for them
and then the rods are snapped into channels that you will now fix to the roof.
5. There are instructions in the headliner kit for drilling the channel holes.
Illustrations 2,3 and 4 show the end fittings being screwed into place,
and their clips being attached, and finally the rod
extending from the end clip (#4).
You will be drilling into the old headliner backing board and into the metal behind it
in order to install these clips. Further details are provided.
6. The center channel will be installed first. Mark the center
(front to rear) at one side of the car and the other. Pencil a line across the car
connecting the marks. It may be necessary to move this line frontward
or rearward to avoid the dome light.
7. Take one of the channels and shape it so that it runs across the roof
along this line. You will be pushing the channel in, bending it to conform
with the roof line and you will have to use a hacksaw to cut the ends to proper length.
8. After the center channel is formed, slide 5 of the clips on to it. The open end
of each clip should point to the center of the car. Screw the clips into the channel.
9. Repeat the channel and clip installation for the first and the third channel.
You will locate the end marks for the front channel midway between the center channel and the windshield.
Similarly locate the third channel. Screw in the first and third channels
with their clips installed, just as you did the center channel.
10. Slide the rods into the headliner rod pockets. They must first be trimmed to size.
11. Each bow is inserted into the clips. The headliner easily adjusts with a little maneuvering.
12. Trim excess fabric to within 3 inches of the moldings all around.
13. Tuck the extra material between the moldings and the old headliner. A spackle knife with edge
protected with electrical tape is ideal for tucking the fabric.
The foam backing will compress and provide pressure to hold the fabric in place.